

There are many ways to begin driving bookings for your new tour business.
You might start by welcoming close friends and family. Then, you might rely on word-of-mouth marketing to bring in a few more customers.
Meanwhile, you’re speaking to guests face-to-face or calling them to make a reservation. You may be keeping track of guest names and phone numbers in a notebook or on an Excel spreadsheet. Or perhaps you’re using a free program like Google Forms to collect their information online.
Yet what happens when you’re online marketing kicks into gear and the phone starts ringing more often than you can answer it?
Manually managing your bookings this way makes it difficult for your business to grow. At some point, your business will outgrow the DIY booking forms.
In this post, you’ll learn how to create an online booking form in three different ways — including with and without booking software.
- How to create a booking form in Google Forms
- How to create a booking form in WordPress using WPForms or Gravity Forms
- When to switch to booking software like Xola
How to create a booking form in Google Forms

If you are a brand new tour operator with only a few bookings per month, you may want to try manually managing your bookings.
Google Forms is one of the most popular, free DIY booking form creators. It’s easy to use and share with your guests — although you’ll need a process in place to process guest payments after they submit the form.
Let’s take a look at how to create a booking form in Google Forms.

Step 1: Open Google Forms. Start a new form, and name it. Add a description if you’d like. Click the “+” on the right-hand side to add a question. From the pull-down menu on the right of the text box, choose “Short answer.”

Step 2: Start adding fields representing the information you need from each guest. This might include:
- First Name
- Last Name
- Mobile Number
- Email Address
- Activity Date
- Activity Time
- Number of Guests
- Comments/requests
Tip: Make sure to check off “Required” for the line items that guests shouldn’t skip over.

Step 4: When you’ve completed the form, click the “Send” button. You can then choose to send the form to guests via email or share it as a link. You can also copy the HTML code to embed the form on your website.
How to create a booking form in WordPress using WPForms or Gravity Forms
If you have a WordPress site and are still interested in manually managing everything, you could try this option instead.
There’s a WordPress plugin called WPForms that can help you set up a booking form directly on your site. However, you will need to download a separate plugin to allow online payments.

Step 1: Install and activate the WPForms plugin. Learn more about installing a plugin here.
Step 2: From your WordPress dashboard, scroll over to WPForms and click “Add New.”

Source: WPForms
Step 3: Name your form, and scroll down to the template section. Here you’ll find an online event registration template. Click “Use Template” to start building your form.

Source: WPForms
Step 4: Create your form. You can add, delete, or edit all of the template fields. To add a form field, drag the desired field from the left-hand panel to your form. The template will already come with the following line items:
- Name
- How did you hear about this tour?
- Number of guests
- Date/time
Step 5: Save your form and configure your notification settings. When someone submits a form, you’ll receive a notification about it.
Step 6: Configure your form’s payment settings so that customers can pay through your website. You’ll first have to install the right payment add-on, such as PayPal or Stripe. Then, you’ll click the “Payments” tab in the form editor to integrate the plugin.

Source: WPForms
Step 7: Add the form to your site. You can add it to a blog post, new or existing page, or sidebar widget through the WordPress block editor.
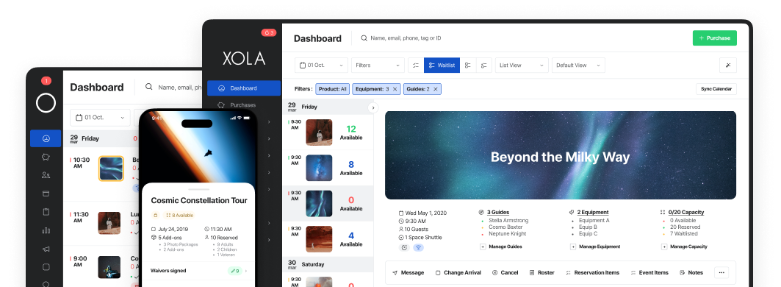
When to switch to booking software like Xola
Xola is an online booking software built for tour and activity operators. This means that the software comes equipped with everything you need to manage online reservations — including a booking form optimized to drive more direct bookings.
Your website will then become a 24/7 reservationist: You’ll be able to accept and process bookings at any hour of the day. A visitor no longer needs to call you or walk in on site to book a tour or experience with you. Instead, they can just book from your website.
This information will be stored on your Xola dashboard, and you’ll be able to access it at any time.
Once guests have filled out the booking form, they’ll be able to pay for the experience right then and there. Guests will have the flexibility to pay with cash, check, credit card, coupons, gift offers, or store credit. They can even split the payment among other members of their party.
Your guests will then receive Xola’s confirmation email as soon as the booking is made. This email will contain their booking information, as well as recommendations on how they can make the best out of their experience.
Your booking software can also help you keep track of your resource availability, ensuring that you never overlook your equipment, rooms, or tour guides.
Beyond that, Xola also provides a suite of growth and marketing features to help operators boost sales.
The booking platform easily integrates with all the major OTAs, including Tripadvisor/Viator, GetYourGuide, and Expedia. This helps small operators expand their reach to the millions of users that use those travel booking platforms daily.
***
Investing in a good online booking system is the smartest decision for tour operators that want to grow their businesses. While a DIY booking system may work for a company that’s just starting, it becomes increasingly difficult to manage multiple bookings without a booking system.
Plus, the less time you spend managing your bookings, the more time you have to focus on improving your guest experience and growing your business.
Are you ready to take your tour company to the next level? Xola can make it happen. Try Xola today.